
Why make this recipe
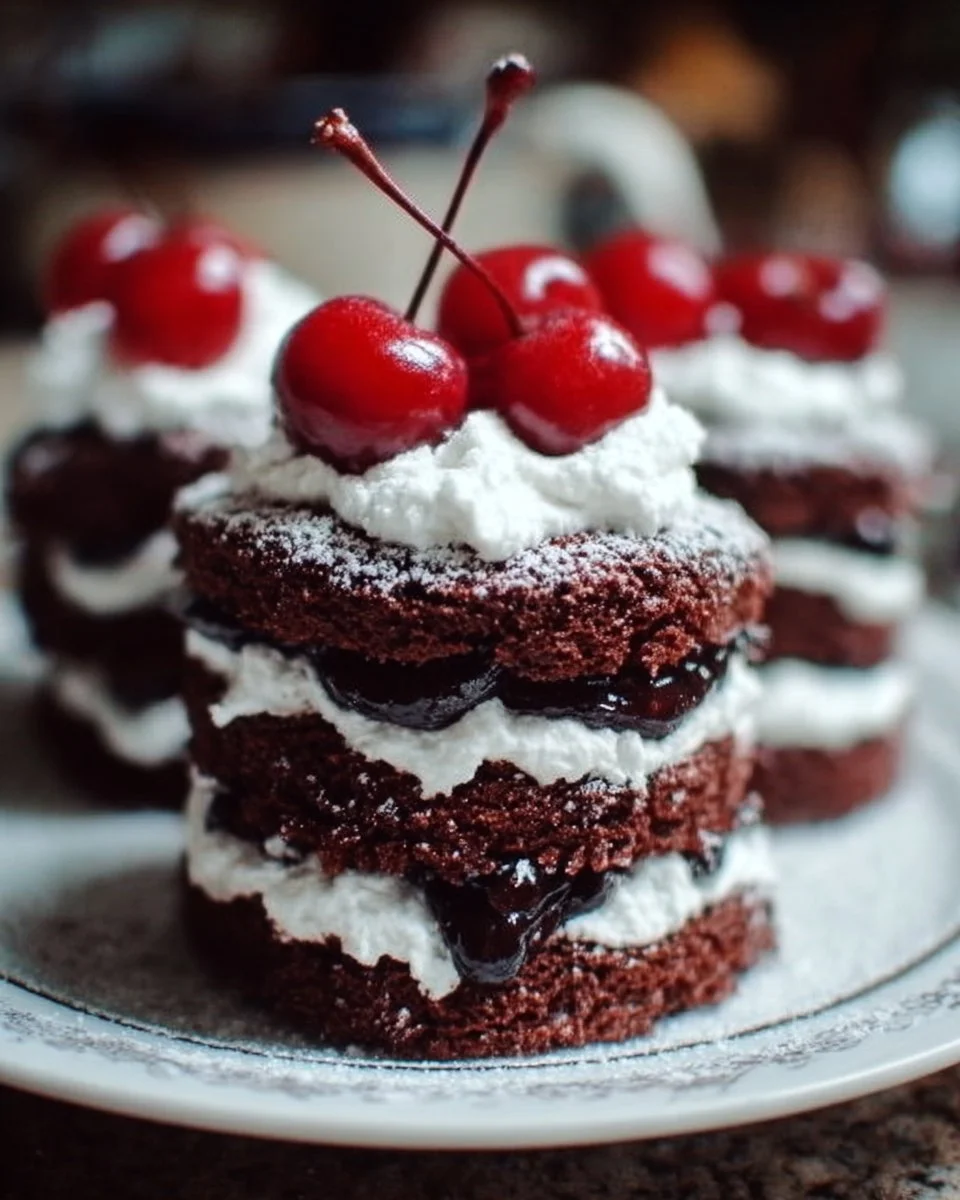
Mini Black Forest Layer Cakes are a delightful twist on the classic Black Forest cake. These individual cakes are perfect for parties, birthdays, or any special occasion. They are cute, easy to serve, and packed with rich chocolate flavor, sweet cherries, and fluffy whipped cream. Everyone loves their own little cake, making them a hit at any gathering!
How to make Mini Black Forest Layer Cakes
Ingredients
- 1 cup all-purpose flour (Can substitute gluten-free flour for a gluten-free option.)
- ½ cup unsweetened cocoa powder
- 1 cup sugar
- ½ tsp baking powder
- ½ tsp baking soda
- ¼ tsp salt
- 1 large egg (Can use flax egg as a substitute for vegan version.)
- ½ cup milk (Use dairy-free milk for a dairy-free option.)
- ½ cup hot coffee (Can substitute with hot water.)
- ⅓ cup vegetable oil
- 1 tsp vanilla extract
- 1 ½ cups cherry pie filling (Homemade or store-bought.)
- 1 ½ cups cold heavy cream (Coconut cream is a good dairy-free alternative.)
- ¼ cup powdered sugar
- 1 tsp vanilla extract
- Optional: 2 tbsp cream cheese (For stabilizing the whipped cream.)
- Fresh cherries with stems for decoration
- Chocolate shavings or curls for topping
Directions
-
Preparation: Preheat your oven to 350°F (175°C). Grease and flour mini cake pans or use cupcake liners.
-
Baking: In a mixing bowl, combine the flour, cocoa powder, sugar, baking powder, baking soda, and salt. Mix well. Then, add the egg, milk, hot coffee, vegetable oil, and vanilla extract. Mix until smooth. Pour the batter into the prepared pans, filling each about halfway. Bake for 15-20 minutes or until a toothpick comes out clean. Let the cakes cool completely before removing them from the pans.
-
Assembling: Once the cakes are cool, slice them horizontally to create two layers per cake. Place one layer on a serving plate. Add a spoonful of cherry pie filling on top and then a layer of whipped cream. Place the second layer on top and repeat the process. Top with more whipped cream, chocolate shavings, and a fresh cherry for decoration.
How to serve Mini Black Forest Layer Cakes
Serve the Mini Black Forest Layer Cakes on individual plates or a platter. They are great for birthdays, wedding receptions, or as a sweet treat after dinner. Each guest can have their own mini cake, making it easy to enjoy.
How to store Mini Black Forest Layer Cakes
To store Mini Black Forest Layer Cakes, place them in an airtight container in the fridge. They can last for about 2-3 days. Make sure to keep them separated with parchment paper if stacking to prevent sticking.
Tips to make Mini Black Forest Layer Cakes
- Ensure all ingredients are at room temperature for the best results.
- Lightly whip the cream to keep it fluffy and easily spreadable.
- Use quality cocoa powder for rich chocolate flavor.
- If you want a more intense cherry flavor, add more cherry pie filling!
Variation
You can switch up the flavors by using different fruit fillings or adding layers of ganache between the cake layers if you want to go above and beyond!
FAQs
Can I make these cakes ahead of time?
Yes, you can bake the cakes a day in advance. Just store them properly and assemble with the whipped cream and cherries on the day you plan to serve.
Is there a gluten-free option for this recipe?
Absolutely! You can substitute the all-purpose flour with gluten-free flour to make these cakes gluten-free.
How can I make these cakes dairy-free?
Use dairy-free milk and coconut cream for the whipped topping. They will still be just as delicious!
Mini Black Forest Layer Cakes
Ingredients
Method
- Preheat your oven to 350°F (175°C). Grease and flour mini cake pans or use cupcake liners.
- In a mixing bowl, combine the flour, cocoa powder, sugar, baking powder, baking soda, and salt. Mix well.
- Add the egg, milk, hot coffee, vegetable oil, and vanilla extract. Mix until smooth.
- Pour the batter into the prepared pans, filling each about halfway.
- Bake for 15-20 minutes or until a toothpick comes out clean.
- Let the cakes cool completely before removing them from the pans.
- Once the cakes are cool, slice them horizontally to create two layers per cake.
- Place one layer on a serving plate. Add a spoonful of cherry pie filling on top and then a layer of whipped cream.
- Place the second layer on top and repeat the process.
- Top with more whipped cream, chocolate shavings, and a fresh cherry for decoration.