Ingredients
Equipment
Method
Making the Cookies
- Cream butter and sugar until light and fluffy. Beat in egg and vanilla.
- Whisk together flour, baking powder, and salt. Gradually add dry ingredients to wet, mixing until just combined.
- Divide dough in half, flatten into discs, wrap, and chill for at least 1 hour.
- Preheat oven to 375°F (190°C). Roll out chilled dough to 1/4-inch thickness and cut out bear shapes.
- Place cookies on parchment-lined baking sheets and bake for 8-10 minutes, until edges are lightly golden.
- Let cookies cool on baking sheets for a few minutes before transferring to a wire rack to cool completely.
Decorating the Cookies
- Prepare royal icing: beat powdered sugar, meringue powder, and warm water until stiff peaks form.
- Divide icing; color one portion red for Santa hats and another small portion black for eyes/noses. Leave some white.
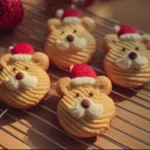
- Pipe a red Santa hat onto each bear cookie, then outline and flood.
- While the red icing is wet, add white sprinkles to the hat brim and pom-pom area.
- Once red icing is dry, pipe small black dots for eyes and a nose.
- Let decorated cookies dry completely before storing.
Notes
Ensure your butter and eggs are at room temperature for a smoother dough and better cookie texture. For crispier cookies, bake a minute or two longer.